
by Rick Marshall
Supply chain issues due to the pandemic reinforced our decision to become more self-reliant and dedicated to garden production. (And less tied to suppliers who are affected by issues that we have no control over.) We slowly changed from casual gardeners interested in making salsa to die-hard gardeners with a desire to produce food for our family.
Our house sits on three-quarters of an acre lot in the Illinois suburbs of St Louis. Most of our land is on a hill. But there is a flat spot at the bottom of our backyard. This is where we have been building our small garden for several years. By no means are we expert gardeners. But we want to share the conversion of our garden over the last few years with all of you.
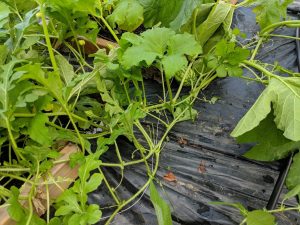
2017: Our garden was a mess and needed constant weeding
 In 2017 we converted our garden from planting rows to a raised bed garden system. But the weeds were horrendous, and we were spending about an hour per week weeding. We tried using plastic inside the raised beds to keep the weeds at a minimum but it didn’t work well for us.
It was challenging to access some of the plants due to the proximity of fencing and the raised beds planted too close together. Plus, the garden was a mess and needed to be reorganized. St Louis has hot and humid summers, and weeds thrive on the weather. Sometimes it was difficult to get motivated to weed the garden in June, July, and August because it was so steamy.
End of 2017: We discover Minibeds on Plastic
At the end of 2017, not long after the final harvest, we came across Herrick Kimball’s Minibeds on Plastic. His system focused on maximizing production and minimizing the weeds. It made sense to us, so we bought his well-written, helpful PDF guide.
Kimball has comprehensive and well-documented Annual Reports on the Minibeds on Plastic system on his website. Herrick’s website contains videos from other people who have used the Minibeds on Plastic system for their own garden. He developed this system for his upstate New York farm. However, the videos show people in Illinois, Wisconsin, and Oklahoma successfully using this system to produce wonderful gardens.

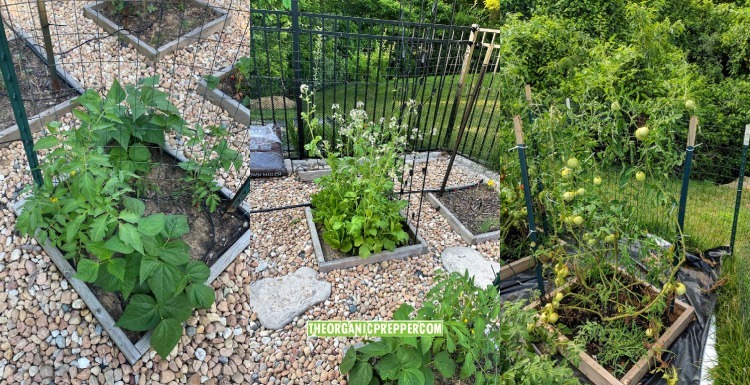
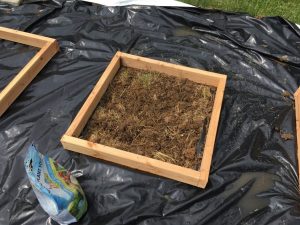
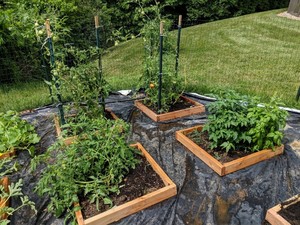
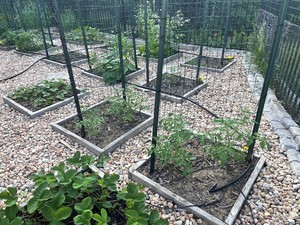
Minibeds on Plastic consists of several 30″ by 30″ small raised beds made of wood. The raised beds are spaced approximately 18″ apart and constructed on top of a plastic mulch barrier. The plastic inside the wood frames is cut out and removed, and used as mini planting beds. Plastic is used over the area surrounding the mini-beds to hold moisture in the soil and prevent weeds from growing.
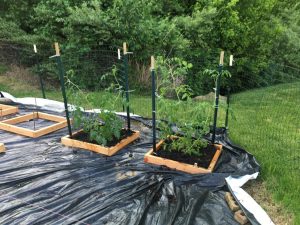
May 2018: Our garden makeover begins
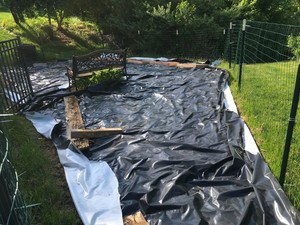
To get started, we rototilled the entire garden (not everyone does this) and covered everything with the thin plastic we purchased from Farm Plastic Supply. Covering the garden with plastic was the most challenging part of the garden makeover. The plastic is very thin, and any gust of wind lifts it and blows it around. Illinois is known for our wind, so we fought the plastic until we had it anchored to the ground.
We tried to keep our Strawberry plants intact by cutting a hole in the plastic around them and anchoring the plastic around them with the bench. But it ended up not working, and we covered them up with plastic later in the year.
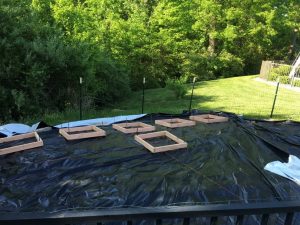
After we laid out the plastic, we used the wooden Minibed frames and landscape edging to hold the plastic down. The Minibed frames are secured to the ground with 2′ lengths of 3/8″ rebar. It works to hold them very steady, and in turn, the wooden Minibeds hold down the plastic film. We used string guides to ensure we had the 18″ spacing correct and in a line to keep the Minibeds organized.
We got a late start planting our garden in 2018
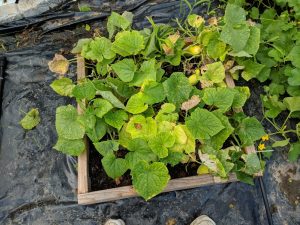
We usually grow most of our plants from seed, but in 2018 we were late. So, we went to the garden center and couldn’t resist buying two huge tomato plants. Those two plants were the first we planted in our newly renovated garden using recycled leftover pieces of our fencing for tomato cages. Along with the tomatoes we added cucumber, watermelon, zucchini, and hot peppers.
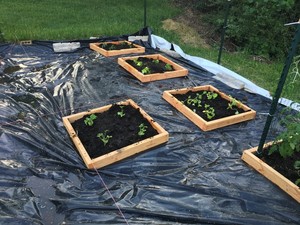
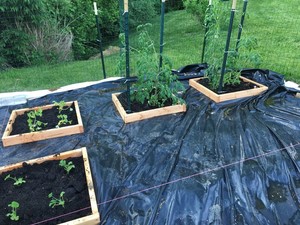
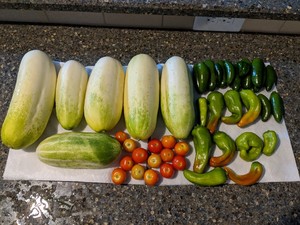
In June we added a few more Minibeds and the garden shifted into high gear. The growth we experienced in the first month of our Minibeds on Plastic experiment shocked us. July 15, 2018 we began harvesting our garden. It was an excellent year for our garden. It produced heavily through September and gave us a lot of enjoyment.
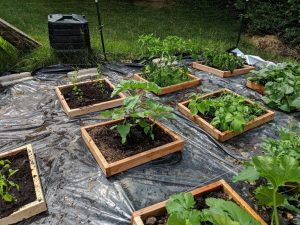
The Minibeds on Plastic system changed our garden
Our garden was an overgrown, inconsistent producer with many areas that were hard to access and in constant need of weeding. Minibeds on Plastic changed it into a well-organized system that now produces an abundance of fruit and vegetables and very few weeds. It took a lot of work to get there. But we did most of the hard work in late fall and winter after the final harvest.
Now, our garden produces:
- Several types of tomatoes
- Tomatillos
- Sweet and Hot Peppers
- Lettuce
- Radishes
- Carrots
- Garlic: Garlic grows amazingly fast. Did you know the word Chicago comes from a Native American word for garlic?
- Zucchini
- Butternut Squash
- Strawberries
- Onions
- Pole and Bush Beans
- Cucumbers
This past spring, we also added apple trees to our garden, and are looking to add more fruit trees in the coming years. We have always tried to set aside tomato and pepper seeds from the previous year’s harvest to use in the following year’s planting. This year there was a shortage of seeds so were delighted to have the ones we saved from last year. We plan to keep a lot more seeds from many more varieties.
Other benefits of the Minibeds on Plastic system
Gardening should be fun. We enjoy planting and harvesting our garden when it is cool outside. Spending time in the middle of summer weeding our garden when it is hot and humid is not enjoyable! With the Minibeds system, weeding is minimal. It makes gardening much more fun.
Consistent, efficient watering. Custom-fit drip irrigation only waters where we want and doesn’t water unproductive parts of the garden, which helps keep the weeds from growing. And, in this time of drought, the last thing we want is to waste water. Drip irrigation keeps a consistent flow of water to our garden. The tomatoes split less frequently because they are consistently watered—the entire garden benefits from targeted watering.
The many benefits of plastic. We have been using the same black plastic film for the past three years, and it doesn’t show any signs of failure. The plastic slows down evaporation and retains more moisture in the soil. So, the garden needs less frequent watering than before we switched to the Minibeds on Plastic system. (Especially helpful for potential droughts.)
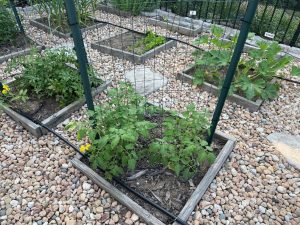
Note: The black plastic keeps the garden warmer during the hot summer months. We recycled some of our landscape rock to cover the black plastic to combat the heat. It keeps the garden cooler and keeps our feet from getting wet when we walk through the garden after the rain.
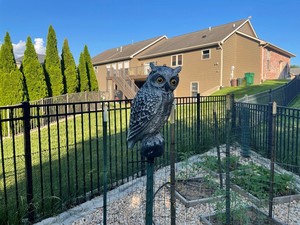
We continue to experiment with fencing
We live on the very edge of suburbia and have many critters who like to nibble on our garden. Keeping them out has been a challenge. In the past, all it would take is one overnight feeding frenzy, and they would decimate our green beans, lettuce, and peppers.
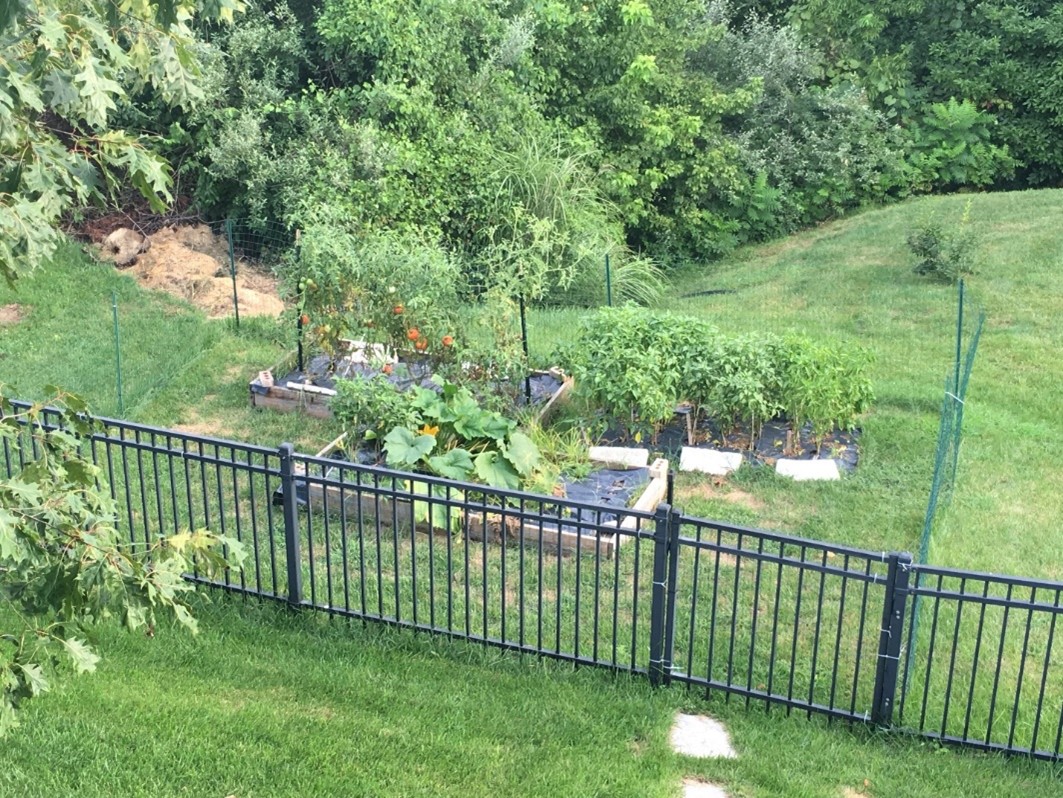
In 2020, we installed an aluminum 5′ tall fence to deter the deer from eating our garden. (Although they nibble on our apple trees planted outside the garden fence.) Initially we installed a wire mesh fence inside the aluminum fence to keep smaller animals like foxes and rabbits out of the garden. A third layer consisting of a plastic mesh fence was installed in 2021 to keep the smaller rabbits out of the garden.
So far, it seems to be working. We haven’t seen any critters in the garden yet this year.
Want to be more self-sufficient? Grow a garden
Becoming more self-reliant is not something that is accomplished in a single year. It is more similar to a long-distance race. By making small, incremental changes to our system that compound year after year we become more and more self-sufficient. Check out Erica’s book on starting a homestead here for more details.
Covid has taught us that the food supply chain is fragile and can be compromised and interrupted. Gardens are about growing your favorite foods, but these days they are also about providing food security for you and your family.
Gardening is a process, not a one-and-done. Have you tried something different that has improved your garden dramatically? Have you run into any problems that have been difficult to solve? Let’s talk about it in the comments.
About the Author
Rick Marshall lives in the Illinois suburbs of St Louis and founded the Mission Endure Website and Podcast.


25 Responses
Please let me know if you have questions or comments
Thanks Rick. I am going to apply your techniques to my garden as well. I had my garden decimated by not only Texas Blizzard in February but also our deer thinking my garden is buffet. LOL. I also planted late this year and ran to grab some tomato plants from local ace hardware and they seem to be doing pretty good. Any suggestions on Cantaloupe? They have taken over my side planters but not producing.
Potasium encourages plants to bear fruit. Banana peels planted around the roots or as a tea to water in. Should help.
Thanks for the suggestion clergylady. I haven’t heard this before, but I will try it the next time I plant. It sounds like a great way to go organic with your fertilizer
Thanks for the comment TexasAntigone. We have not tried planting cantaloupes yet, so I don’t have any recommendations. We always want to plant them, but it seems like there are so many great things to plant that we get overcome with other fruit and veggies. Sorry I can’t be of more help. Rick
How cool! I’ve never heard of this so I’m glad you’ve published it. Question: how does the plastic affect drainage? If I understand properly, you’re cutting planting holes in the plastic but mostly leaving the plastic under the bed, right? Thanks!
Hi Jayne. Thank you for the comment and the question. We had never heard of the system before a few years ago and we are really glad we tried it. When we started our garden we bought this thin plastic weed blocking mulch: https://farmplasticsupply.com/plasticulture/weed-control/20bw-wc. When we received it I thought it was so thin it wouldn’t last very long, but it has proved very durable. I think we can get a couple of more years out of it. We leave about a half inch of plastic around the inside perimeter of the wood minibed frame and use a razor blade or an Xacto knife to trim the plastic out the entire inside of the minibed, not just cut holes for the plants. This allows us to use the entire area inside the wood frame of the minibed for growing, makes it easy to do crop rotation from year to year and grow cover crops like buckwheat during the winter to replace some of the nitrogen lost to plants, and it keeps the area outside of the wood minibed frames free of weeds. Our own added modification is to add the small river rock on top of the black plastic outside of the wood frames to help keep the garden cool and dry. Before we added the river rock there would be pools of water on the plastic after a rain, but the river rock has fixed that problem. Rick
Going to apply this to my raised beds next year!
Thank you!
1stMarineJarHead. Thank you for your service. I am retired Air Force and always liked working with the USMC. Good to hear you will use this next year. It worked for us. Rick
This looks beautiful… I would love to replicate as I have the exact same issue: a good patch to work with – but small yield and very many weeds and hard work. My issue, though, is that I would not like to use plastic… both because I try to avoid buying plastic as much as poss, but also because I would worry that it might be less than ideal in terms of leaching into the soil…… What I am wondering is whether this might work with any other materials? What about gravel and sand, I wonder, for example? Thank you for this great article.x
Gravel works well as a mulch to hold in water and keep down weeds. I like to lay 3″-4″ smooth river rock for a look I like around my desert fruit trees. I can move a stone and plant an herb or flower in that spot. I’m thinking of trying it in a corner of the strawberry bed. Not sure they wouldn’t get too hot in bright sun.
I cover the garden in cardboard and mulched leaves for the winter. That way as I open up planting areas it usually weed free. I plant intensive companion planting so once plants mature there is little bare ground. That saves water and weeding.
Thanks for your comment Sophie Gale. As clergylady mentions in her comment below, there are other systems that will work too. Here in the St Louis area the weather is like Eden’s greenhouse in the summer. The weeds are relentless and the plastic works well to keep the weeds from growing. The Black and White Plastic is a UV-treated polyethylene film. Herrick has done research on the plastic and he believes that over an extended period of time the plastic may degrade to a small degree and there may be some particulate release into the soil. The good news is that the particle size is too large for he plants to synthesize it. As far as soil biology goes, every year we have been altering our garden slightly and we pull up parts of the plastic. Our soil went from a very clayey and hard packed soil with no biotic life to one that has an enormous amount of worms and other biotic life in it. It helps to build the soil and we aren’t using any chemical herbicides to remove weeds or grass. The plastic does it all. Rick
Try sheets of carboard covered with woodchips. This will allow soil to be built over the years. The problem I had with rocks is that after a few years the rocks get covered with enough dust/pieces of dirt from the beds/etc. that weeds blowing in on top of the rock can get a foothold and start growing. It was a royal pain to eventually haul all those rocks out.
The fencing issue is easily solved. My wife and I built a chicken wire run over our raised beds and containers but the weeds are insane. Cant wait to try this.
Sounds good Ric. It took us the last 3 years to find a fencing solution that worked for us. We finally got to a point where we have a 3 layered fence. This was the magical part of the fence that kept all the critters out: https://www.homedepot.com/p/Everbilt-36-in-x-5-9-10-in-Black-PVC-Poultry-Netting-EPFB3625/205968157. It works great for the small bunnies and squirrels
How come using plastic inside the raised beds didn’t work for you but using this method does? I love the concept but it seems confusing. I know one year I put weed barrier down and the weeds were still growing underneath it.
There were a couple of reasons why it didn’t work for us. The first reason is because the weeds continued to creep up between the plastic and the wood frames of the raised beds. The second reason was because there were lots of grass and weeds in the walkway between the raised beds. I would have to weed eat and mow between the raised beds and the raised beds and the fence every week to keep the grass/weeds down and pull the grass/weeds that continued to encroach into the raised beds from beneath the raised beds. The black plastic on the outside of the wood frames keeps all of those weeds and all that grass away. I can also garden now while wearing shorts and not get eaten alive by bugs and mosquitos. Using the black plastic inside the raised beds still left me with 72% of the garden to weed and mow. Putting the black plastic on the outside of the minibeds means that same 72% of my garden is weed free and grass free, allowing me to concentrate my maintenance time on the 28% of the area designated for production.
Nice article! For those who prefer not to use plastic, couple suggestions. Number one, no till. It messes up the soil structure and can actually encourage weed growth. Pair that with (#2) a lasagna garden method (of which this plastic is a ‘type of’) (all those amazon boxes can have a second and more productive life although purists will shame you for the ink on them) Number 3 and most important is to mulch heavily after planting. Leaves, grass clippings, straw/hay (a topic of its own), wood chips (another somewhat controversial issue).
Thanks for the comment Grammyprepper. I agree with your no-till suggestion. I tilled the ground the first year before I laid the plastic down, but now I realize I probably didn’t need to do it. I haven’t tilled anything since and I actually have my tiller up for sale right now because I don’t think I need it any longer! We normally mulch with leaves, grass clippings and wood chips to help control the weeds within the minibeds. I like the idea of using the Amazon boxes as a mulch layer. As inorganic as it seems to use the black plastic as a mulch layer, this is year 4 for the original black plastic and it has shown no signs of wear. I don’t know how long it will last, but we are going to find out how long it will keep up and continue to use it until failure. It stays on top of the garden summer and winter and helps control erosion. By covering the black plastic with river rock I think it will last for many more years to come
Rain? Must be nice to get rain. The last rain we got was The second week of March. AZ summers are brutal! It was 123 here yesterday.
Hi GeoAZ. Thanks for the comment. I’m not sure the Minibeds on Plastic are such a good idea for your climate. They do help to hold he moisture in the soil, but I think you have to have moisture in the soil for it to keep it there. It has been brutally hot and humid here this week. I hope the weather has backed off of 123 from yesterday for you
No no no. In a few years, this will all be microplastics. Whoever came up with this idea didn’t give it much thought FOLLOW THROUGH. A MUCH better, cleaner, healthier (and FREE!) alternative would be cleaned cardboard. Plastic, unless you add holes, which would allow weeds to grow, will block water. That results in runoff, flooding and mosquitos. Cardboard biodegrades, feeds worms (who thank you for the meal by making tunnels that allow aeration and by pooping in your garden). I like Daisy’s ideas, but this one is a HUGE thumbs down.
Thanks for the comment Samanda. I felt the same way when we started this experiment. I was hesitant to use plastic at first because of the reasons you stated. But, my soil has improved tremendously since I started using it. Every year we do some maintenance on the garden and look under parts of the plastic while we do maintenance and there are earthworms everyhere. They love it. I think it is because the plastic doesn’t just act as a weed mulch layer keeping the weeds down, but it also holds the natural moisture in the soil beneath it. The soil pulls up water from beneath it kind of like a wicking action and stays moist when all the other soil in our yard is dry. I didn’t expect to like the plastic and I thought we would only try it for a couple of years to see how it worked, but now I am a believer. know it is hard to believe, but what very little run-off we have goes into watering the apple trees we have planted just behind the garden. There are no puddles, so there are no mosquitos in the garden. I am a bit surprised myself, but I want my garden to be productive, and I believe that not having expend the electric or gasoline powered energy to get that done is very environmentally friendly. Plus we already recycle all of our home delivery boxes for other uses
Thanks for the ideas for raised beds. How do you go about replenishing your soil YoY? Do you have a separate compost pit that you then work into the beds in the spring? Do you use other fertilizer?
We use 3 ft wide black plastic on our garden but not raised beds. We cover and pin the whole garden with plastic, then fold back the plastic just far enough for rows. The pins are made somewhat like croquet wickets only about 1 1/2 inches wide and are galvanized for longevity. In the fall, after all the produce is harvested, the plastic is unpinned, rolled up and stored in the shed. The garden is cleared and the compost is spread over the garden and left to overwinter. Next spring the plastic is pinned a little different to make the rows in a different spot.
We put cardboard between the plants and tucked under the plastic to keep weeds down there. It either rots or it is under the plastic the next year since we move the rows YoY. A centered sprinkler is turned on whenever water is needed. We have gravity fed mountain spring water so no chemicals there.
Hi JRS. Thanks for the comment. We replenish the soil by growing a cover crop in the winter, normally Buckwheat or Sweetpeas. We don’t do normal tilling, but we do break the soil with a shovel or a hayfork and mix in compost and worm castings in the spring before we plant anything. During the growing season we use a lot of mulch. We have been using the same minibeds since the beginning, and they are still producing well. My plan was to replace the plastic after 5 years, and that will probably be when we move the minibeds around to new locations within the garden. Right now our garden is in a fixed location, but we can move the minibeds around a bit within the garden. We haven’t used chemicals on the garden since we built it. We have been capturing rainwater off the roof using a rainbarrel and the garden seems to like it. We may beef that system up this summer.