
By the author of The Prepper’s Guide to Post-Disaster Communications and The Cartoon Ham Exam Handbook: A Complete Ham Radio Technician License Study Guide
I’ve been spending a bit of time experimenting with some different off-grid cooking methods of late, and recently have done a little bit with the infamous Dakota fire hole. Long touted as the ideal means of cooking your food when you have to be careful with the light and sound signature (such as with modern day American backpackers that were stuck in Peru), it seems that everybody is a fan of this type of campfire.
So, I’ve been doing a bit of testing of late to see how it fares. You can read about my last foray with Dakota fire holes here. In that article, I noted that it took 25 minutes to bring 0.85L of water to a boil, generated a small column of smoke about the size of a large apple, and required very little fuel.
I wanted to know if there was an easier way to build it, though.
If you don’t have the time, energy, or desire to sit there in the evening and try to dig out a small tunnel in the ground with a pointy stick, is there an alternative method?
That’s what I looked at today.
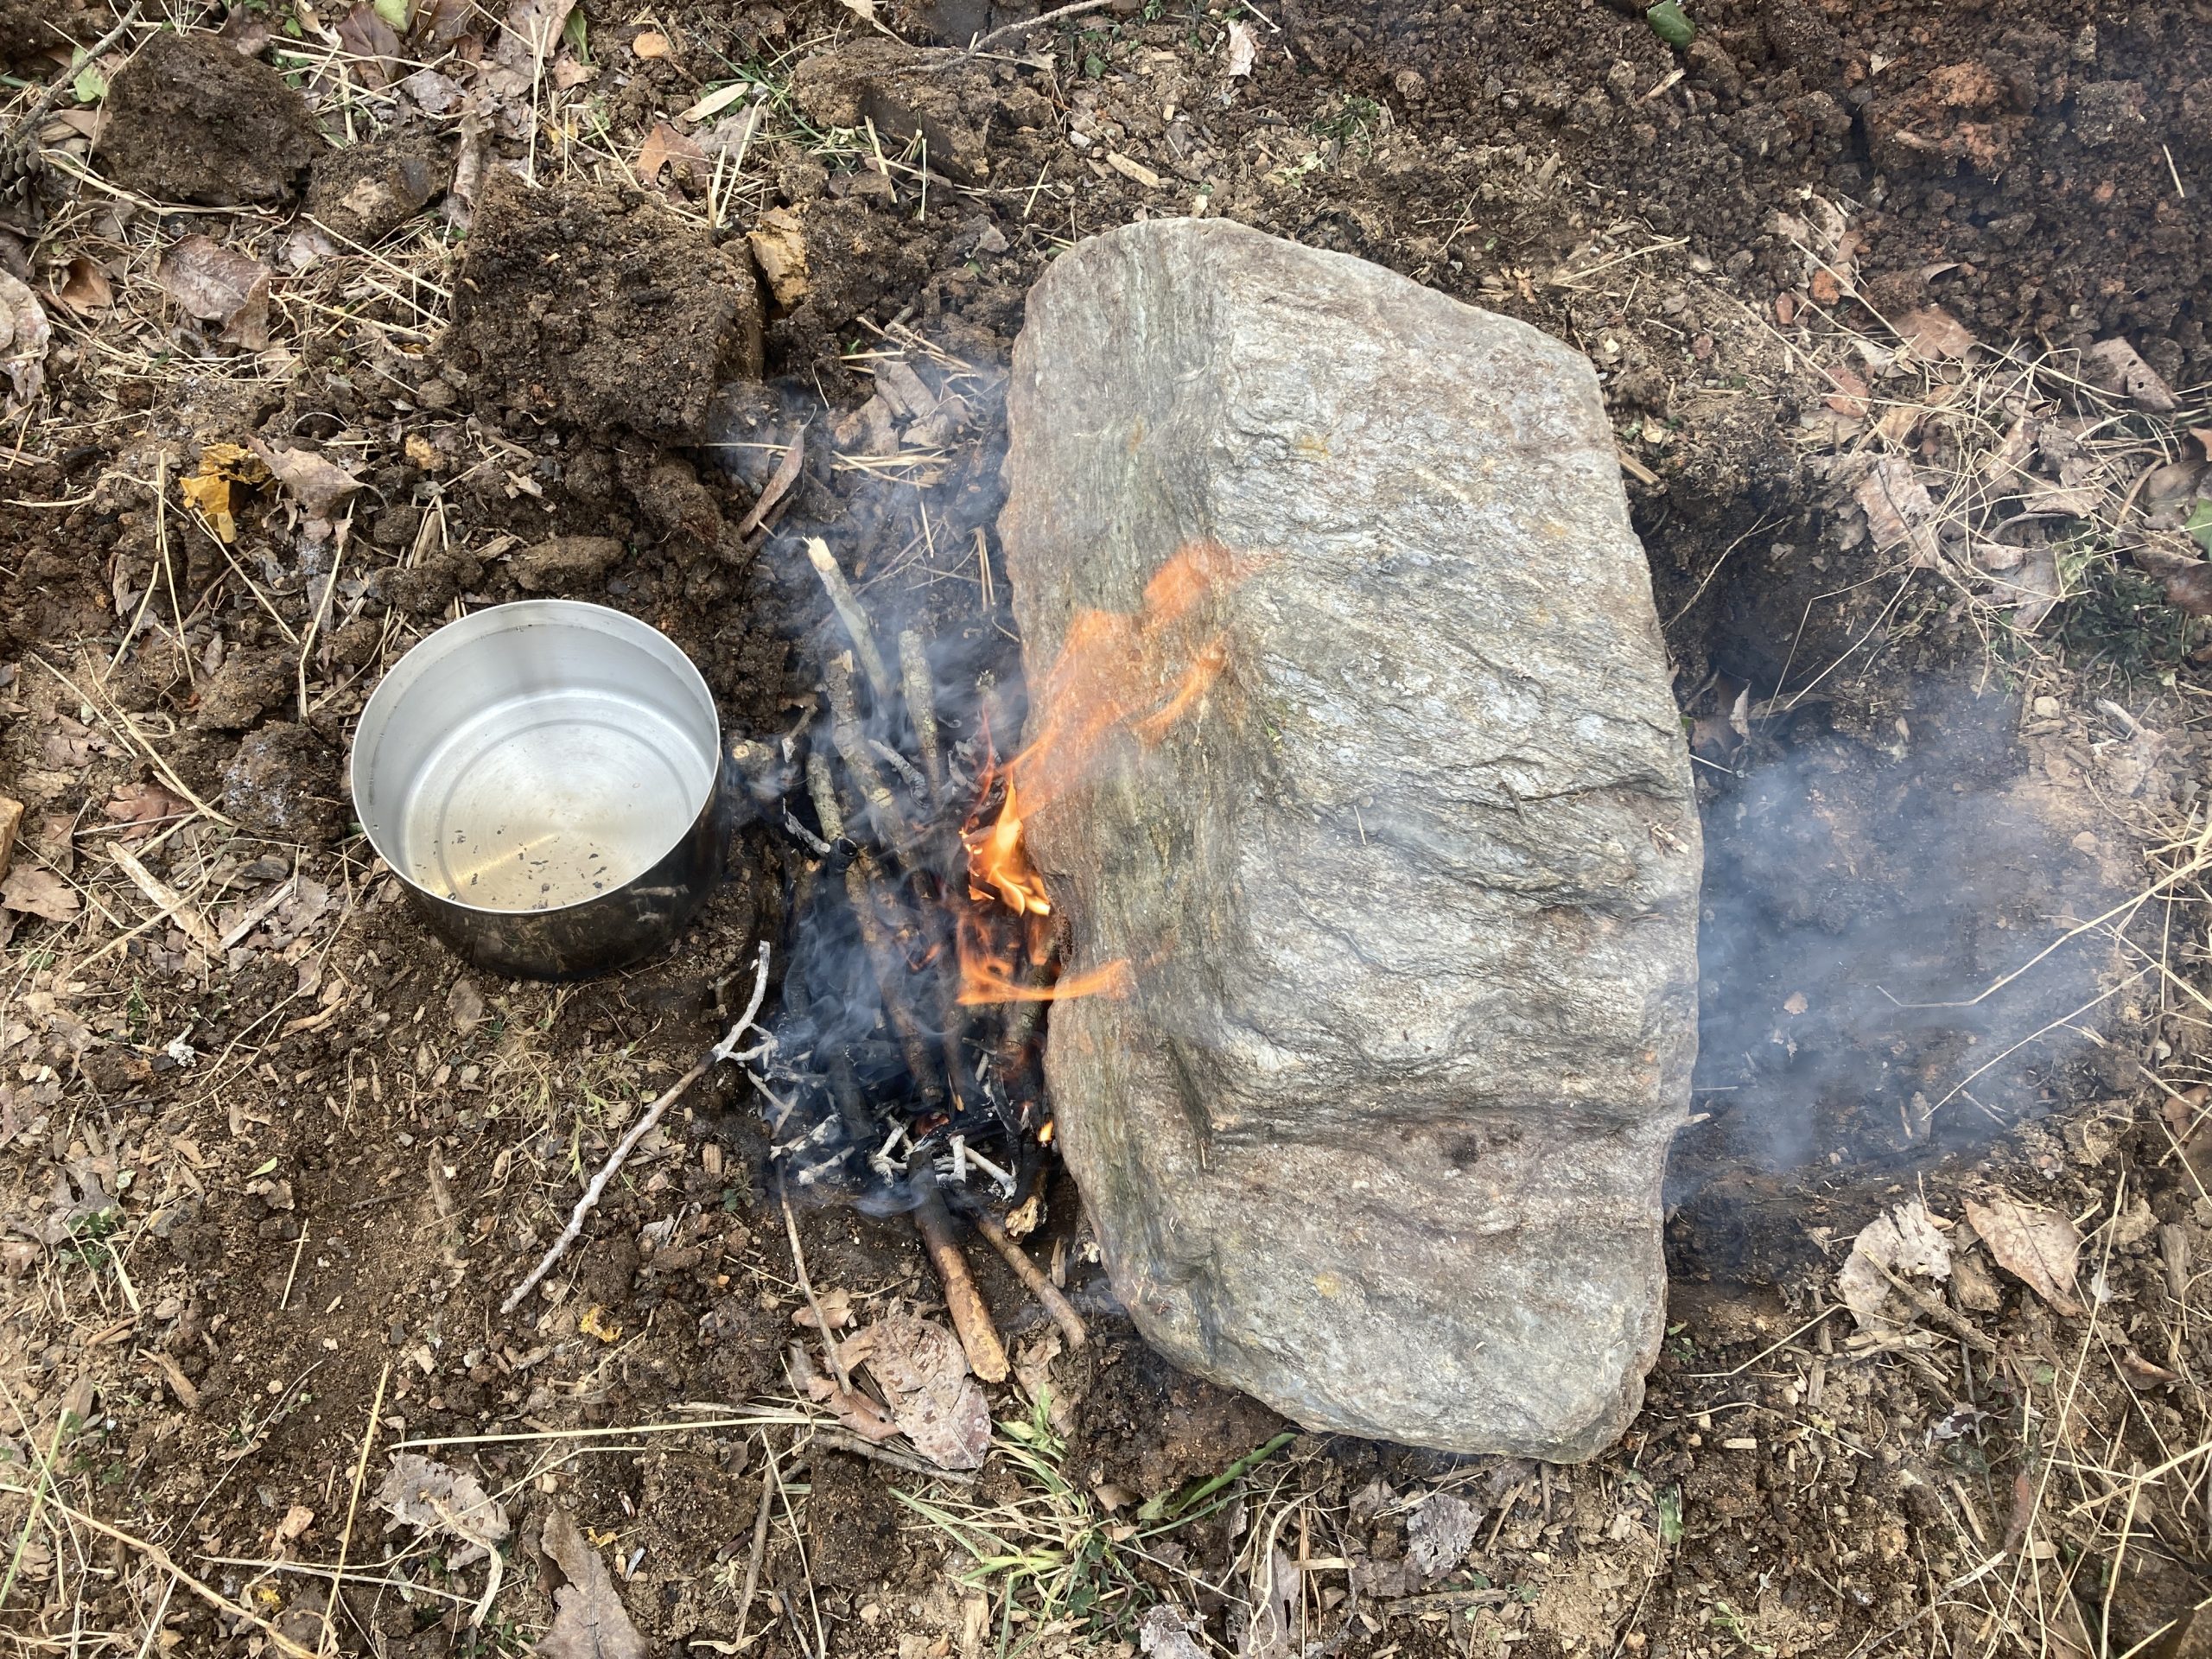
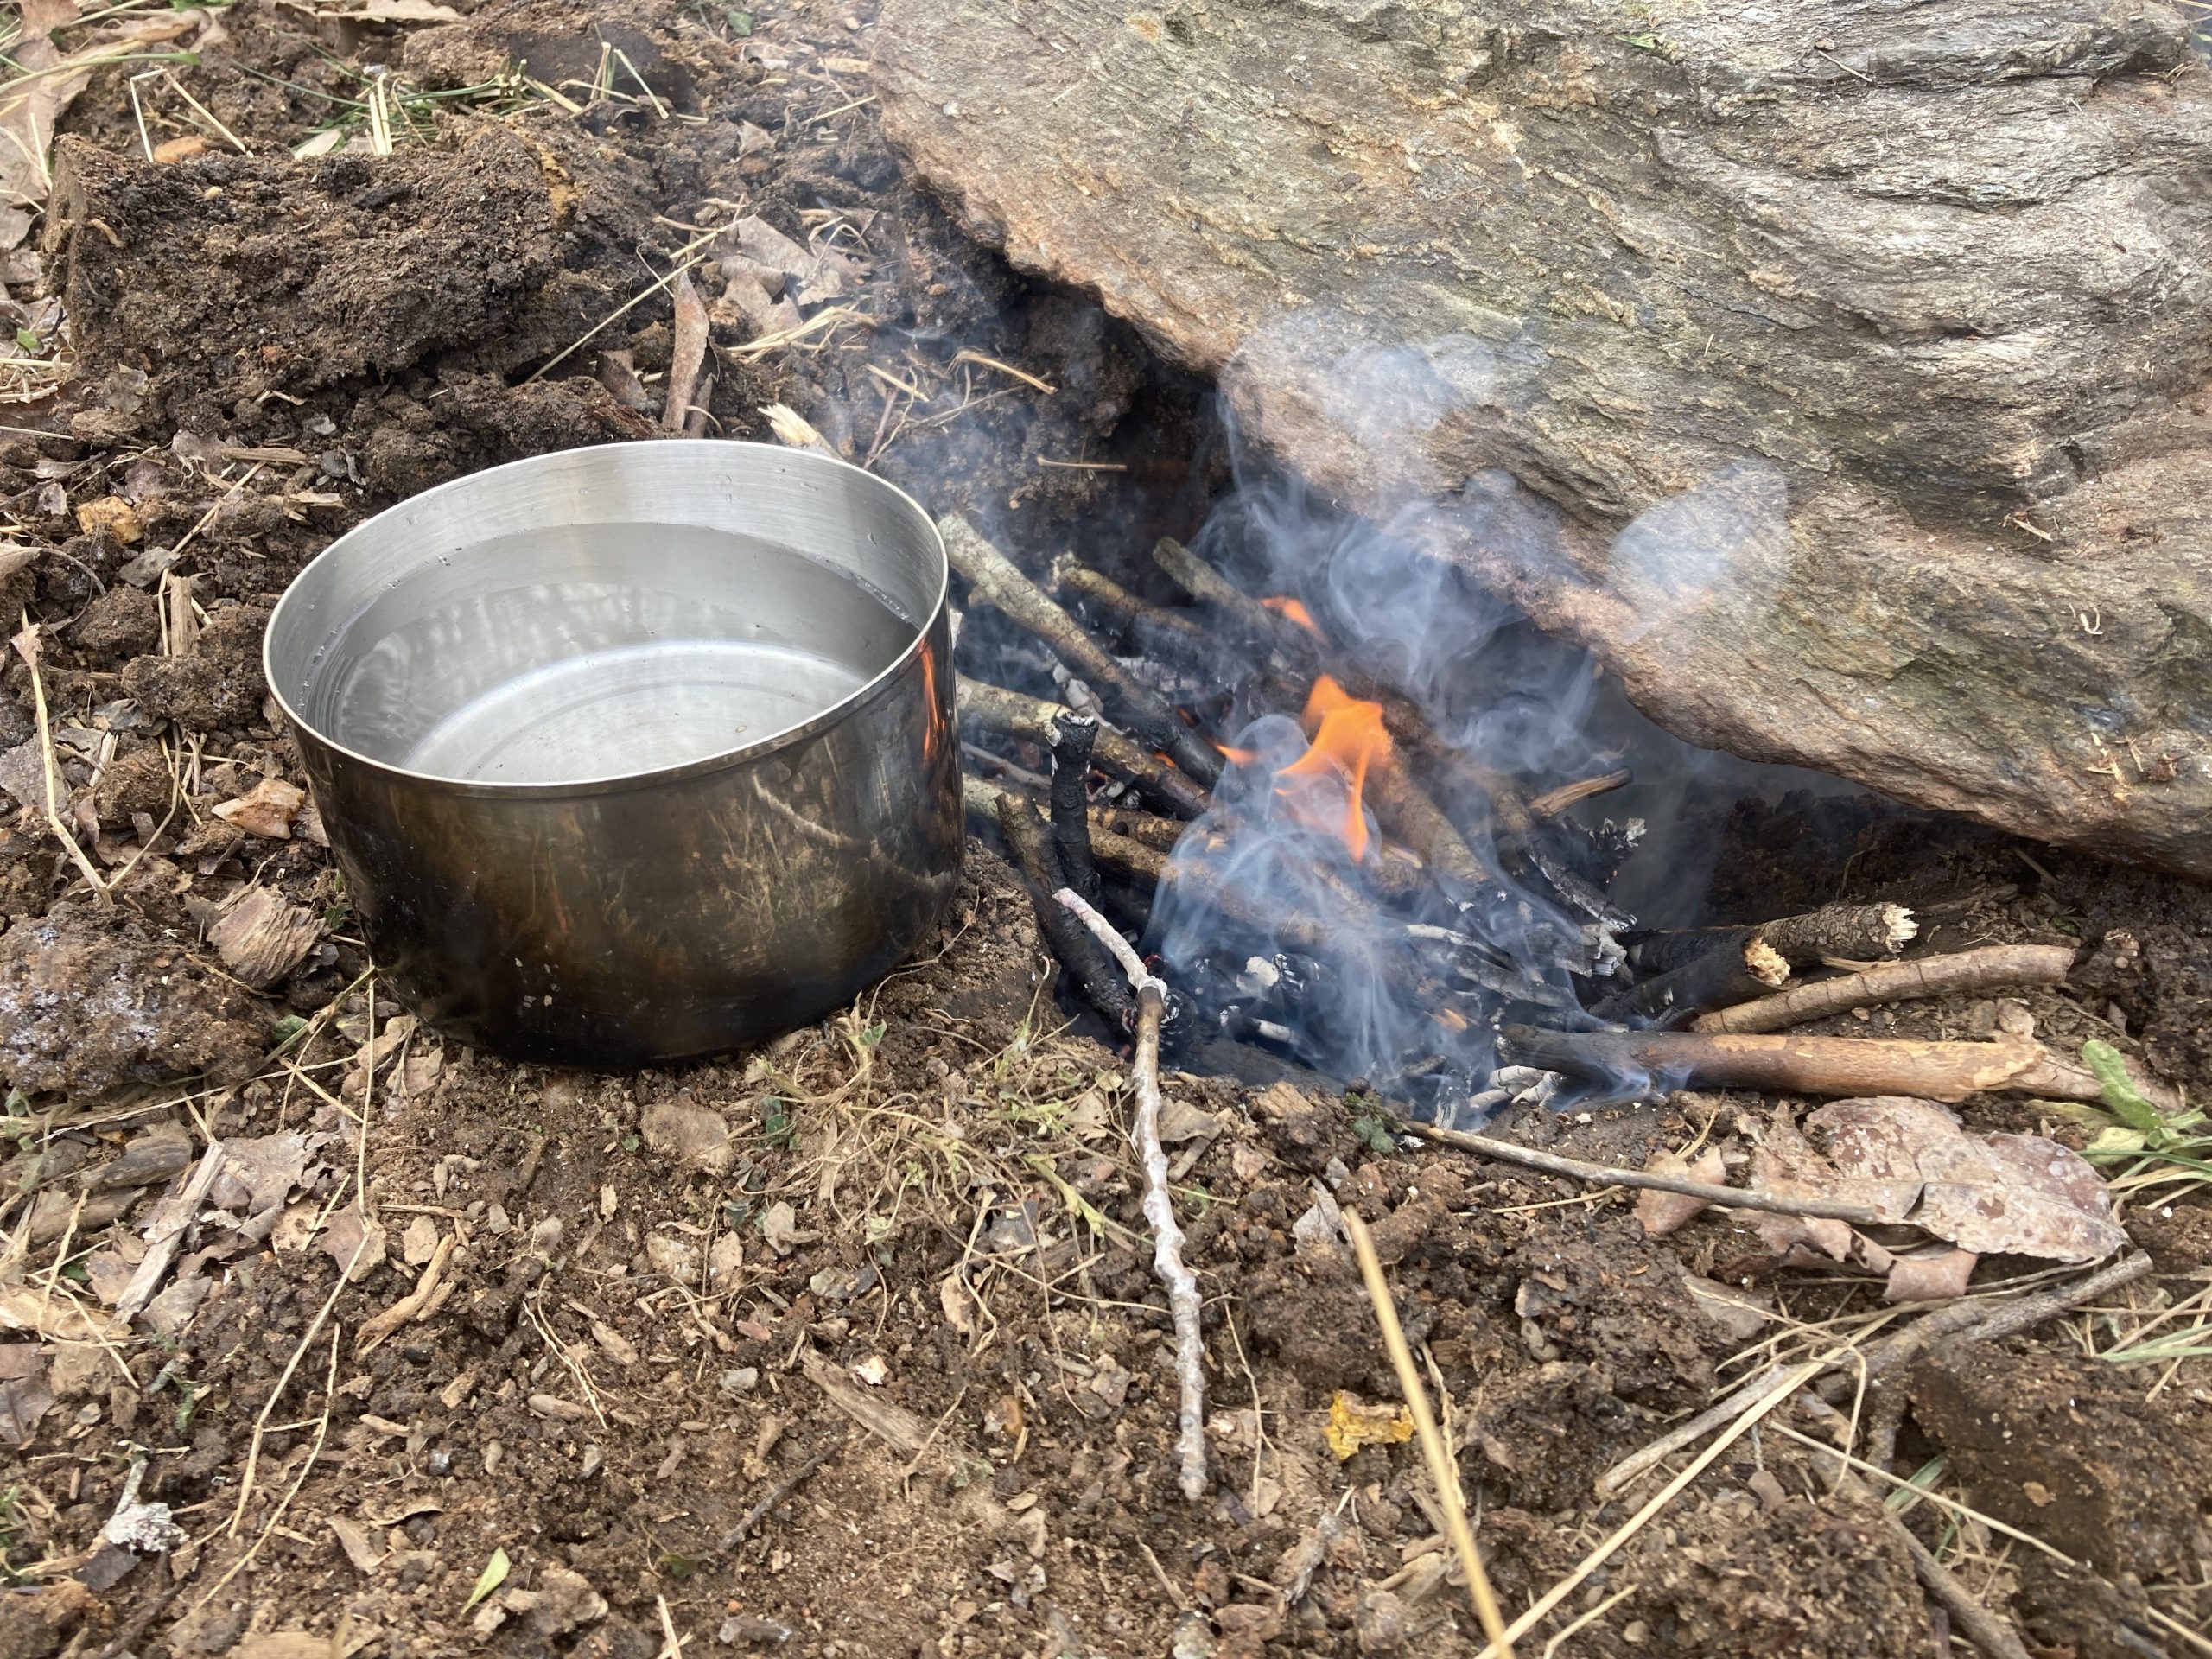
The method I used this time was using a large rock to form the top of my tunnel. This made it so that instead of having to worry about delicately scraping out a little tunnel in the dirt, I could simply scrape out a depression, throw the rock on top, and voila – a tunnel.
Here’s how it went.
Digging the trench
The ground was frozen solid when I did this, so I had to use an actual shovel and a pry bar to scrape everything out. That’s definitely something to remember if you’re thinking about building one of these types of fires in the dead of winter.
If it had been summertime, this would have been a piece of cake and I could have easily done it with a flat rock, small shovel, or the like in a matter of minutes. Shoot, if the soil was loose enough, you could even scrape it out with the heel of your hiking boot.
So, digging the trench really isn’t going to be a problem you’re going to face.
The trench I dug here has a rough peanut shape, is a foot deep, is two feet long, and is about a foot wide at the bulbs of the peanut.

No, I don’t know why I chose a peanut shape. I just did. I guess I was just being a goober.
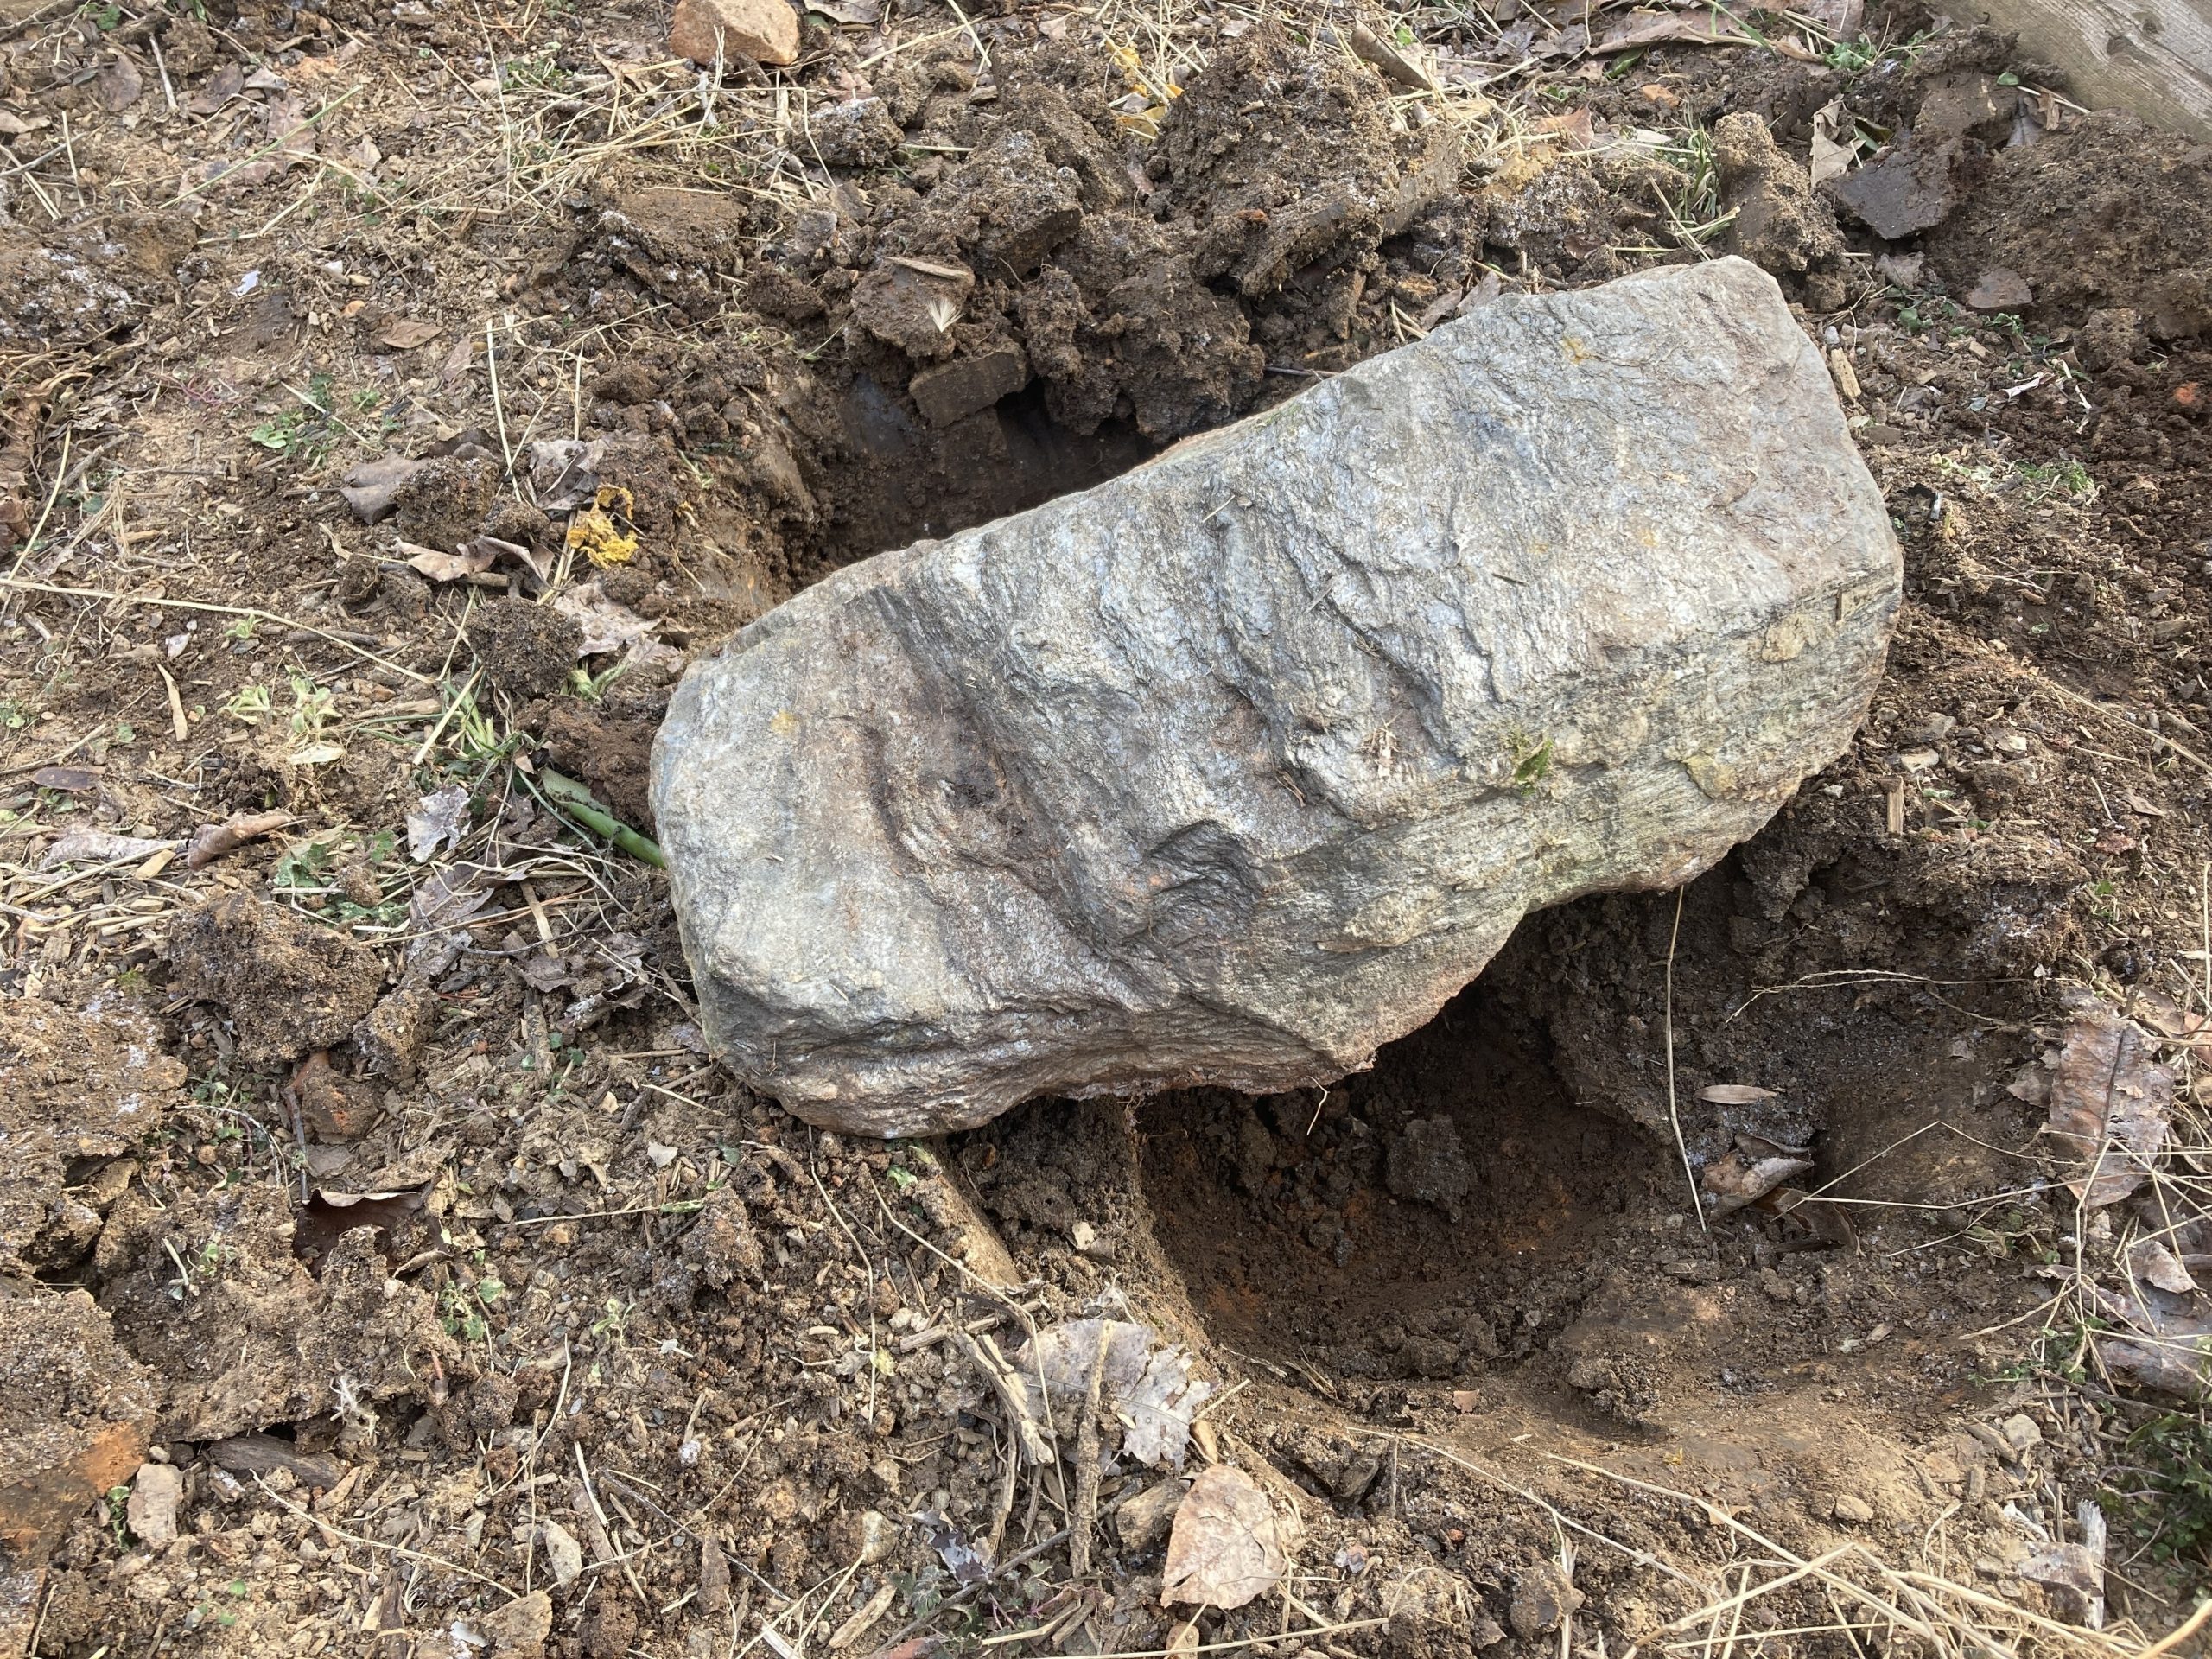
The rock
I live in a really rocky area, so finding a large flat rock to place over the scrape in the ground wasn’t hard at all. Tony Nestor points out that you want to make sure that the rock you use for this method isn’t going to explode once it becomes heated by the fire. Avoiding rocks from the bottom of a creek or stream where they’ve been inundated with water is a big part of this.
I found a 2’ long and 9” wide rock and threw it on top.
In theory, this should allow the fire to draw in oxygen through the “entrance” opening, much like a rocket stove sucks in oxygen.
Lighting the fire
This was a piece of cake. While everything was frozen solid, it was also bone dry. The fire was started in a matter of seconds.
(Looking for more information on what to eat when the power goes out? Check out our free QUICKSTART Guide on the subject here.)
Time to boil water
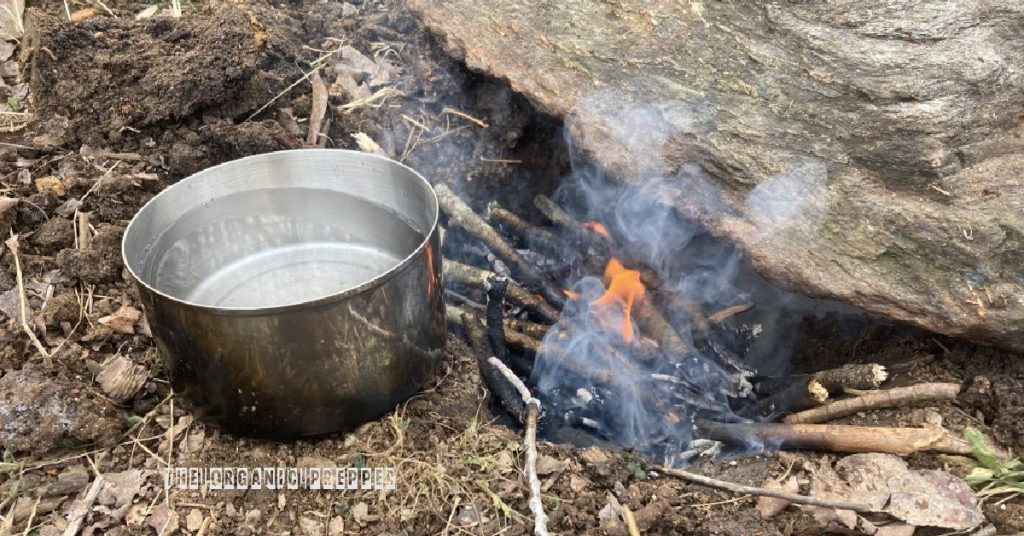
I used the same 0.85L Kelly Kettle pot full of cold water to simulate what you may have at hand in a survival situation, measuring the time it took from when I placed the pot down to when it started boiling.
If you read my last Dakota fire hole article, you saw that I used the top of a hobo stove as a form of burner for me to rest my water pot on. I squished it down in the small hole atop the fire, and it stayed in place pretty well.
I wanted to simulate how things might be if you found yourself in a Juliane Koepcke-type situation though where you had minimal equipment. What would things look like then?
So this time I scraped out a small shelf beside the fire to rest the pot on. While I knew that this wouldn’t expose as much surface area of the pot to the fire, I wanted to see if this was a suitable alternative.
It wasn’t.
Forty minutes came and went, and this pot had only then started to collect bubbles on the side walls of the pot. Not having all day to sit around a campfire, I scrapped the experiment by that point. This leads me to believe that my “shelf” idea is absolutely terrible. This is one way not to build a lightbulb.
Smoke signature
I was really surprised at how much smoke was generated this time. Admittedly, this was a larger Dakota fire hole than my hand dug tunnel one, but the amount of smoke generated was easily 5x the hand-dug tunnel.
Somebody could have most certainly seen this if they were close enough. I used the same wood as I used last time, so I don’t see where that would have made a difference. The only thing that I can think about is that maybe my stone version of the hole was more of a trench than an actual tunnel. Perhaps it didn’t burn as hot so it generated more smoke? Let me know what you think in the comments below. This is the first time I’ve ever done this type, so I’m definitely open to suggestions.
The only thing I can then think is that if you’re going to build a Dakota fire hole and you truly are worried about the amount of smoke that’s going to be produced, you need to A) build the scrape as small as possible, and B) potentially build up a dirt chimney or something on the fire side so that the air gets better cycled like a rocket stove, the fire burns hotter, and less smoke is produced.
Fuel needs
I have some missing data here since I never was able to bring the pot to boiling, but it took me four large handfuls of sticks to last forty minutes and not bring anything to a boil.
(Want uninterrupted access to The Organic Prepper? Check out our paid-subscription newsletter.)
Suggestions
Outside of the above already given, I have a few thoughts on Dakota fire holes that I think are (maybe) worthwhile. First and foremost, you need a pot that can be hung from something. If you’ll remember, this was one of the main lessons from my last experiment with these. My shelf method left me with a pot full of ash (lye?) that still wasn’t boiling. If you were needing to boil water to drink, that would make for an unpleasant amount of time spent making less than a liter of water.
I’m considering drilling three small holes in my little pot so that I can attach a chain to it and hang it. This is, what I think, the best way to boil water with a Dakota fire hole. I did find a small little pot that can be hung over a fire that costs all of $20. I think I’m going to get one.
If you’re roasting a squirrel or baking some fish, I don’t think you’d have much problem at all here. It’s when you’re trying to boil something that you end up with issues unless you have the necessary tools to improvise.
But what are your thoughts? Do you use a Dakota fire hole? have you ever tried this technique? If you have any advice for me here on making this work better, let me know in the comment section below.
About Aden
Aden Tate is a regular contributor to TheOrganicPrepper.com and TheFrugalite.com. Aden runs a micro-farm where he raises dairy goats, a pig, honeybees, meat chickens, laying chickens, tomatoes, mushrooms, and greens. Aden has four published books, What School Should Have Taught You, The Faithful Prepper, An Arm and a Leg, The Prepper’s Guide to Post-Disaster Communications, and Zombie Choices. You can find his podcast The Last American on Preppers’ Broadcasting Network.


12 Responses
I would suggest that the exit hole (chimney) portion of the Dakota Pit be at a higher level than the entrance hole (fire place) portion, that is neccessary to allow for more of a draw for the smoke. A pile of smaller flat rocks arranged around the exit hole carefully, will produce that higher necessary level.
Thinking the same thing. Fire hole needs to be higher than the vent hole.
Hi yall, using the fire hole you cook over heat rising preferably not on direct flames so scrounge around and source some pinky sized green sticks. You can also cut a metal coat hanger into a few pieces and keep it in your fire kit so you can make a grill of sorts to put on opening. They weigh next to nothing and they don’t take up a lot of space in your kit. Also,you can find other uses for the coat hanger pieces.
Aden,
Concerning the smoke, would you say the wood you used was dry, semi-dry? Hard wood or soft wood?
Another thing I have been thinking about, the length of the hole. Could a longer hole generate a bigger draft/draw, increasing air flow velocity and oxygen content, giving you a better burn?
When we are done with the main furnace, in the spring early summer I clean out the chimney, I can feel a decent amount of air flow going up that 30ft pipe.
Oak and pine mixed, but it was all dry.
I think all ya’ll are absolutely right on both the hole length and the height issue. I didn’t even think about a chimney and all that.
I always learn something from the commenters. Ya’ll are smart people.
There are cups with hangers.
For cups with an inside lip or a neck or holes near the top edge, a fish mouth spreader can be used as a hanger.
Below are links to examples. The “ref” tag has been removed as I am not attempting to profit from these links.
SPREADER: https://www.amazon.com/gp/aw/d/B0000AV13K/
CUP WITH NECK: https://www.amazon.com/Klean-Kanteen-Stainless-Bottle-Interior/dp/B078YZ6537
CUP WITH HANGER: https://www.amazon.com/Lixada-Stainless-Foldable-Handles-Backpacking/dp/B07F1GC6NY
A SHORT HISTORY OF THE LEGENDARY DAKOTA FIRE PIT
https://stealthfyre.com/the-origins-of-the-dakota-fire-pit/
There are some really interesting remarks in that article — in addition to the Dakota, Lakota, and Nakota Sioux Nations origins. For example, it says that dry wood should produce a nearly smokeless fire. It says that unsuitable soil conditions such as rocky, sandy, frozen, boggy, or heavily forested soil conditions make it nearly impossible to build a working Dakota Fire Hole. Those soil conditions make up a large part of the planet. Other than that … it is perfect for stealth camping, survival, and outdoor cooking.
It’s also mentioned that it was taught to the US Army from the beginning of the Vietnam War as a reliable survival method in those soil conditions.
–Lewis
I enjoyed this article! I learned to dig and use a Dakota Hole while I was in the Boy Scouts when I was 12 years old. I am now 64 and have used a Dakota Hole many times since! You can get a really good fire in a Dakota Hole for cooking, and also for warmth without your fire being seen from only a few feet away. As a Scout, I learned how to set up my camp, utilize my surroundings, survive if necessary, and prepare my food. Heck, I can still tie all of the knots!! That was a great learning experience for me!
Smokey conditions suggest a “cool” fire. The essence of a Dakota fire hole is maximum heat with minimum fuel. My guess is that using such a massive rock is a big problem. Your fire is wasting its heat on the rock. If you could find a thin rock, it might work. You also might try heavy bark covered in soil, although I think it might burn.
I tend to agree with Lyle here that rock looked like a heat sink compared to the generally insulating properties of dry dirt.
Also, that rock was acting like a chimney much like how smoke tends to “go to” a tall person near the fire.
But it is good to test ideas before really needing them. Good job and goofd report.
Thanks for the article
I would suggest, since you mentioned that it was a rock rich area, that you take 3-4 rocks and place them around the top of the fire and set your pot on top. That would allow airgaps between the rocks so that the fire is not smothered, while putting the pot directly over the flame. Alternately, weave a pot holder from some roots or other cordage to hold the pot directly over the flame, and suspend from a stick tripod.
Depending on what kind of forest you are in, you can mitigate the smoke problem by using birch wood instead of conifer. Birch tends to produce much less smoke. I’m in Oregon, with mostly fir and pine depending on which side of the mountains you are on, so not a lot of birch but I do manage to see it at times. I think this idea would be spectacular if you are in the northeast.