
I pulled out the Pressure Canner today and dusted it off for the first time in at least a year. It was a year ago when I had Achilles Tendon Surgery and now I was able and ready to start canning. It was also over a year ago that I quit smoking, so the canner reeked of cigarette smoke so I gagged and my throat made funny noises. The odor wasn’t on the inside, mind you, but on the outside. Good thing I already had the vinegar out for the water that goes in the canner, so I set about to clean it inside and out with a vinegar wash, then a good hard dishwasher wash, then lightly oiled the gasket on the lid after thoroughly rinsing. Now I was ready to can something I’d never attempted before out of fear. Bone Stock. Particularly Chicken Bone Stock.
Ironically, as much as I love beef, chicken and fish are the only types of meat I can eat regularly without having stomach issues (unless the beef is grass fed). And, don’t get me wrong, I love moist well-flavored chicken, but it just seems to have such a bad reputation, along with eggs, that I tend to steer clear of them as much as I can. Even so, one can only afford so much fish and grass-fed beef, so chicken inevitably ends up on the menu.
When I buy chicken, I usually buy it in bulk if I can and then I separate it at home. Once home, out comes the bleach, the disposable food handler gloves (I love those things – I used to go through rolls and rolls of paper towels before I found those), the Clorox wipes, and whatever bag or container I’m going to store the various parts in. I always rinse it, and sometimes cut some of the skin and/or fat off it, but it is always the first thing to go in the fridge/freezer. I’ve never been the cause of food poisoning in my family and don’t intend to be in the future.
But, as much as contamination and sickness that can come from poultry scare me, I was really hungry for chicken one day and decided to roast a whole chicken to accompany the beans, squash, and tomatoes straight from the garden, and the guilty pleasure of Stove Top Stuffing that I was craving. Why a whole chicken? Because I wanted to make Chicken Stock, and I needed to can quite a bit of it because I’d just given my last home-canned jar of chicken soup to my sick son.
Bone broth offers benefits that regular stock doesn’t.
The difference between stock and broth are the ingredients, but it’s no harder to make stock than broth. While chicken broth is made primarily from simmering some chicken and a few bones, for chicken stock you want to cook the bones for as long as possible. The reason? Bone marrow.
Bone marrow contains hormones that our bodies need.
Subscribe to our newsletter
Trying to figure out how to stock up while prices keep climbing? We can help with our free guide and newsletter!
According to Science Daily, a study led by the University of Michigan in 2014 stated that bone marrow contains a hormone called adiponectin that helps break down fat, has been linked to a decreased risk of heart disease, and helps regulate blood sugar. Even more fascinating than that is the National Institute of Health has stated that this protein hormone is more present in lean patients than in obese ones.
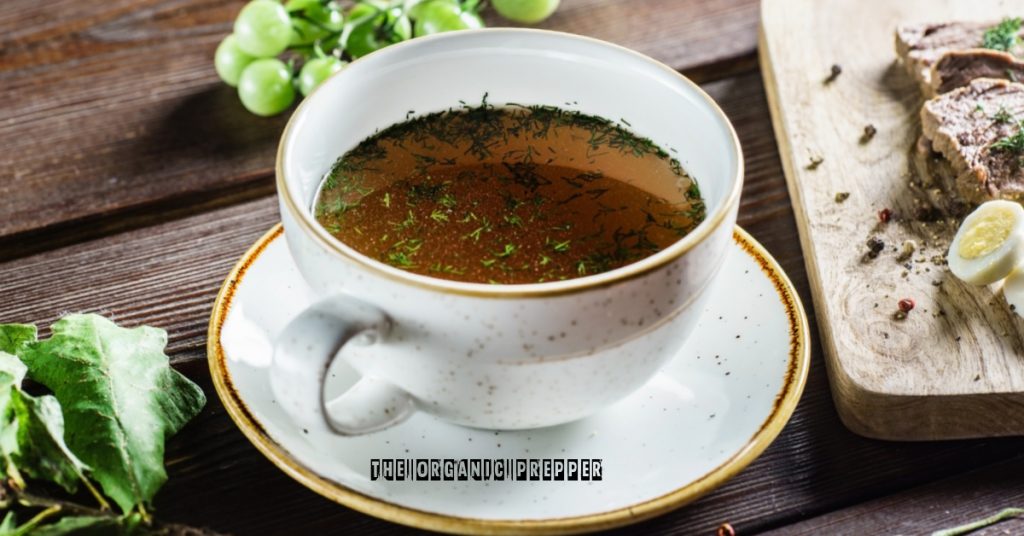
Best of all, while we’re still not sure if it’s the chicken, the bones, the veggies, or the love that’s used to make it, chicken soup just plain makes us feel better. The stock makes it nutritional gold.
Making bone broth takes some time, but it is worth it.
So, after I’d satiated my hunger with roasted chicken, baked yellow squash, steamed green beans, a few slices of tomatoes and cucumbers, and a spoon of forbidden stuffing, I quickly took everything my husband hadn’t eaten and plopped it into the crockpot; bones, meat, skin and all. That was fun compared to painfully taking the meat off the bones for leftovers. Then I washed a few vegetables, cut them up, and added them to the pot; peelings and all. Carrots, onions, a head of garlic, celery, a good amount of sea salt, and enough water to cover it all. I would have added a few tomatoes for extra Vitamin C but my son is allergic to tomatoes, so I added some Apple Cider Vinegar, just about a ¼ cup, instead. I put the lid on, set in on High mode for a few hours to get it cooking, then put it on Low for 20 hours – the max my crockpot will go.
Now it was time to break some bones.
I’d been told by various people to break the bones of the cooking meat to ensure that the marrow gets pulled out. Those little bones would surely be easy, but I was concerned about the thigh bones and possibly the scapula, so I asked my husband to bring me the hammer, set up my chopping board, fished the thigh bones and a shoulder bone out of the pot, then slid two of those nice little food handler gloves over the business end of the hammer. With gloves on my own hands, I picked up a thigh bone just to see how hard I was going to have to hit it to break it. It seemed pretty firm – until I squeezed it. The thigh bone crumbled in my hands and I was delighted as all get out. I picked up the other thigh bone and it crumbled as well, with all those vitamins and proteins spilling out. Ecstatic, I started digging bones out of the hot soup, crushing them with my fingers, and burning myself of course (only slightly), reveling in how valuable this soup stock was going to be. I stirred it well, added back some water, put the lid back on, and set it on low again for another 20 hours. I was totally tickled pink.
Apple Cider Vinegar for the win.
You have to strain the stock to remove solids.
Twenty hours later and it was time to strain and store the chicken stock. Stirring it gently, I had my colander ready, as well as my fine mesh strainer, and a tea towel as well. My plan was to strain it three times. With a pot in the sink and the colander in that, I started the first strain and was bewildered as almost everything that I’d put in the stock was gone. I raised the colander up and let the remaining juice trickle out into the pan. Ok, I thought, maybe they’re just smaller pieces that slipped through the colander and they’re down in the bottom of the liquid. No problem – planned on straining two more times anyway. That’s when it hit me. The ACV. Not only was the Apple Cider Vinegar good for vitamin C, but it was enough to help pull out the bone marrow, to soften the calcium in the bones, and even help break down the other solids. Now I was beyond stoked and ready to finish straining and taste this stock.
Using a second pan and the fine mesh strainer, I strained it a second time and laughed as I got maybe a cup of solids out of the pour. A final strain through the tea towel/cheesecloth and there was maybe a tsp of something or other left. With a teaspoon of my own, I tasted the final strain. It was awesome. Slightly salty and bold with hints of carrot and celery, onion and garlic, and yummy chicken. Full of protein, full of vitamins and minerals. Now it was time to store it.
Be sure to store your bone broth properly.
Using my Pressure Canner I was able to put away 5 quarts of Chicken Stock and, now that I know how easy it is, and how full of nutrients it is, I plan on doing it again as soon as possible. It’s important to note here that you absolutely cannot store this long term on the shelf in any way other than Pressure Canning. Hot Water Bath Canning simply will not last and you’ll be leaving yourself wide open to food poisoning, not to mention all that work for nothing. You can store your stock in the fridge for up to 5-6 days though. Please check the USDA Food Storage website for guidelines. (As well, be sure to look at Daisy’s directions for How to Pressure Can on the website, and check out her book, The Prepper’s Canning Guide.
As an aside, I should admit that although many people recommend skimming impurities off the stock while it’s cooking, I found none to be honest so I didn’t ‘skim’. Others recommend that you refrigerate your stock until the chicken fat congeals and sits on the top, then skim that off as well. I didn’t do that either. I don’t try to make my canned chicken fat free, so I choose not to do that with my stock/broth. But it is an option if you want a more fat-free stock.
What do you think?
Have you ever made bone broth? If so, what do you include in yours? Please share your thoughts in the comments.
About Sandra
Sandra is a published artist, photographer, fellow prepper, and animal advocate.


14 Responses
i add another step. after simmering the meaty bones until that meat starts to fall off, i pull the bones out of the stock and put them in the oven on low until the bones brown a bit. then they go back into the stock. i use wine to deglaze the oven container the bones were in to get all the tasty bits. the wine is added to the stock where it helps the bones to disintegrate more. the brown from the bones adds a nice brown color to the stock.
for veggies to start the stock, i keep a jar in the freezer compartment of my refrigerator and add carrot tops, onion ends,the last spoon of corn or rice that didn’t get eaten, etc. when it is full, i use it to add flavor to the bone broth i make.
Can you freeze the bone broth instead of canning it?
You sure can!
yup, I freeze mine because I don’t have a pressure canner!
I keep chicken broth in the freezer. Every time I boil chicken I will start with a bowl of chicken broth and add water. This gets my broth more concentrated. It also has all the spices in it. It works great for any thing that we need broth for and is good just warmed up on a cold day.
I do the same but I pour the broth into ice cube trays so if I want to and some flavor to gravy,rice ect or just want a cup of broth I just pull the right amount of cubes out and I’m good to go
Since we lived off grid for 13 years I made mine using a pressure cooker as it saved energy. Also since we had chickens I gave the strainings to our chickens .
There’s no need to cook this for 40 hours. You can make the broth in the pressure canner in about 3 hours total with the same bone crumbling results. Way faster & less energy consumption. Since you’ve already got the canner out you’d might as well take advantage of it’s versatility.
Nice article about the benefits of bone broth. Congratulations on making and canning it. The only aside I would add is that it has been found to be dangerous to rinse poultry. You are more apt to spread potential contaminants around your kitchen than if you just processed and cooked (at high heat as you did) the meat. Thank you for sharing your article. Hopefully more people will attempt to make this healthy beverage/soup base… in the future.
I’ve been making stock from bones for over 40 years. Not only chicken, but turkey, beef, and pork stocks also. I always roast the bones in the oven first before putting them in the 20 quart stock pots. Roasting adds flavor, and help to make a darker colored and rich stock. In with the roasted bones go carrots, onions, and celery. Another thing, I never peel the carots and onions, just wash them well before adding them to the pot. That also adds color to the stock. I mostly can the stock, but do freeze some also. Nothing can compete with soups and gravies using your home make stock!!
I agree with you Jeffrey, I could not start to make bone broth without first roasting the bones, it is most important. I won,t comment on use of bleach, gloves, disposable wipes, stove top stuffing, washing chicken and has not used pressure canner in a year.
I have to admit I chuckled about the ‘overkill’ on the ‘safety issues’ myself. I’ve also noted there is a big camp of roasting the bones, vs not roasting. I have not personally roasted bones, but I wonder if you might have some resources that might show what nutritional value might be lost or boosted by roasting the bones?
I am trying to buy the Preppers Book of Lists but unable to put my address etc in.
Hello – we respect your privacy and don’t require an address. These books are PDF, so they’ll be emailed to you. Does this help?